Showing posts with label diy clothes. Show all posts
 How to Self Draft Sewing Patterns for Raglan Clothes | Easy Tutorial for Beginners

1/12/2024

How to Self Draft Sewing Patterns for Raglan Clothes | Easy Tutorial for Beginners


Do you love raglan clothes, but can't find them in stores or online? Or do you want to express your creativity and make your own unique and flattering raglan garments? If you answered yes to any of these questions, then this blog post is for you.

In this post, I will share with you a video tutorial on how to self draft sewing patterns for raglan clothes, and how to customize them for different styles and designs. Raglan clothes are garments that have sleeves that extend from the collar to the underarm, giving them a distinctive look and fit. They are perfect for casual wear, sports, and layering.

You will learn how to create a basic raglan bodice pattern, and how to modify it for a raglan top, blouse, and dress. You will also learn how to create puff raglan sleeves, balloon sleeves, raglan long and short dresses, and much more.

This tutorial is super easy and suitable for beginners who want to learn how to self draft sewing patterns for raglan clothes. I will show you step by step how to measure, cut, sew, and finish your raglan garments. You will be amazed by how many different raglan clothes you can make with just one pattern.

So, if you are ready to unleash your creativity and make your own raglan clothes, watch this video and follow along. And don't forget to subscribe to my YouTube channel for more sewing videos.


What Measurements do you Need to Self Draft Raglan Dress or Top ?

To make a raglan top or dress pattern, you need to measure the following:

Bust

mannequin and measuring tape around bust part

Waist

mannequin and measuring tape around  waist part

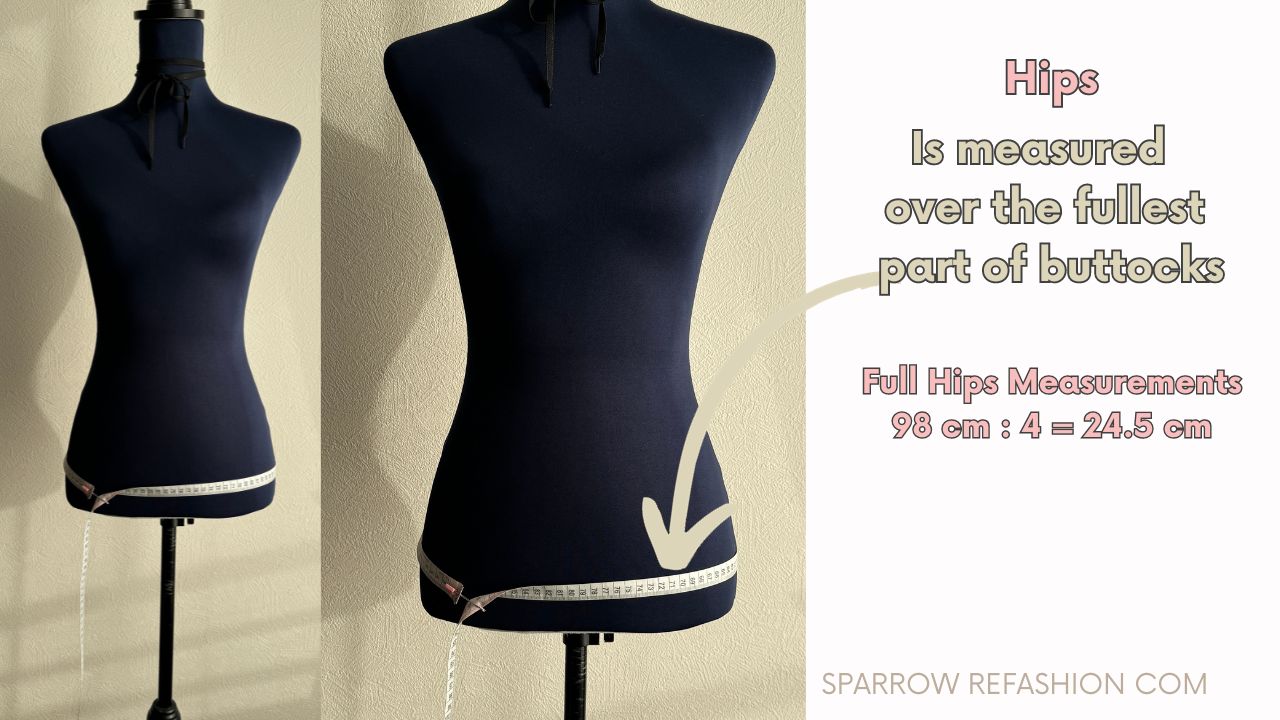
Hips

mannequin and measuring tape around hips part

Desired garment length

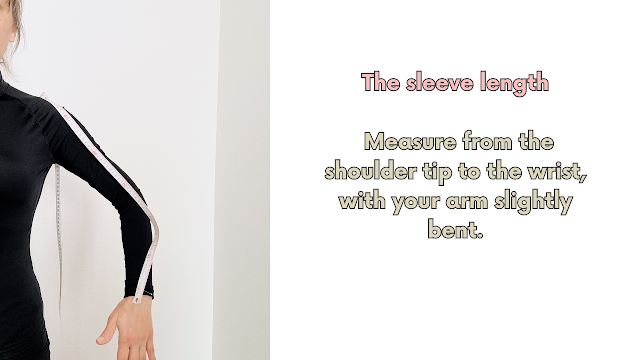
Arm length

sleeve with measuring tape

Upper arm circumference

Wrist circumference

wrist with measuring tape

Check out my detailed post on how to measure yourself for self pattern drafting

 Step by Step Video Tutorial

[Watch the video here]


Detailed Videos on How to Sew Raglan Clothes

How to sew baby doll raglan dress


How to sew boho raglan dress


How to sew Crop and long Raglan Top and Blouse 

Thank you for reading and happy sewing!

Pins:


 How to Refashion a Blanket into a Warm and Cozy Coat with Hood: A Free PDF Pattern and Video Tutorial

12/05/2023

How to Refashion a Blanket into a Warm and Cozy Coat with Hood: A Free PDF Pattern and Video Tutorial


Have you ever wondered what to do with an old or unused blanket that is lying around in your closet? Do you want to turn it into something useful and fashionable that you can wear in the cold season? If you answered yes to these questions, then this post is for you. In this post, I will show you how to refashion a blanket into a warm and cozy coat with hood, using a free PDF pattern and a video tutorial that I have created for you.

Why refashion a blanket into a coat?


Refashioning a blanket into a coat is a great way to upcycle and reuse something that you already have, and save money and resources. You can also create a unique and personalized coat that reflects your style and preference. And of course, you can enjoy the comfort and warmth of a blanket in a coat form.


What do you need to refashion a blanket into a coat?

To refashion a blanket into a coat, you will need the following materials and tools:

How to refashion a blanket into a coat?

To refashion a blanket into a coat, you will need to follow these steps:

  • Step 1: Prepare the blanket. Wash and iron the blanket if needed. Lay the blanket flat on a large surface and cut off any fringes, edges, or labels that might interfere with the sewing.
  • Step 2: Prepare the pattern. Print and assemble the pattern according to the instructions. Cut out the pattern pieces and choose the size that fits you best. You can also adjust the pattern to your measurements, if needed. Check out my post on how to print and assemble my  free pdf patterns  and how to cut out my free pdf patterns.
  • Step 3: Cut the fabric. Place the pattern pieces on the blanket and pin them in place. Cut out the fabric pieces, leaving a 1.5 cm seam allowance around each piece. You will need to cut two front pieces, one back piece, two sleeve pieces, and one hood piece. If you are adding pockets, you will also need to cut two pocket pieces. If you are adding a lining, you will need to cut the same pieces from the lining fabric, except for the hood and the pockets.
  • Step 4: Sew the coat. Follow the video tutorial that I have made for you, where I will show you how to sew the coat step by step. You will learn how to sew the shoulder seams, the side seams, the sleeves, the hood, and the pockets. You will also learn how to sew single welt pockets, which are very handy and elegant. You will also learn how to add a lining, if you are using one. You will also get photos and diagrams to guide you through each step.
  • Step 5: Finish the coat. Trim the excess fabric and press the seams. Turn the coat right side out and try it on. Make any adjustments if needed. You can also add buttons, snaps, zippers, or belts to your coat, if you like. And voila, you have just refashioned a blanket into a warm and cozy coat with hood.

Here is a photo of the coat that I have made from a blanket: 


 Step by step video tutorial on how to sew this amazing coat.

 pins: