Showing posts with label macrame. Show all posts
How to Make a Macrame Feather - A Trendy DIY Decoration

2/13/2024

How to Make a Macrame Feather - A Trendy DIY Decoration


Macrame feathers have become a decorative hit. They are easy to make and can add a touch of boho chic to your home. You can also use them as accessories for your keys, necklace, earrings, or even a bookmark. In this post, I will show you how to make a macrame feather with just a few materials.

Inspiration:


 What you need:

 
- Yarn or string
- Scissors
- Brush or comb, mine I borrow from my dog 😁

How to make a macrame feather

1. Cut one piece of yarn or string to the length of your desired leaf or feather. This will be the spine of your feather. 
2. Cut about 40-50 shorter pieces of yarn or string. These will be the fringes of your feather. You can use one color, two colors, or multiple colors for a more colorful effect.
 
3. Fold the fringes in half and attach them to the spine using lark's head knots. To do this, place the folded end of a fringe over the spine, then pull the two loose ends through the loop and tighten. See the picture below for reference.
 
4. Repeat this step with each fringe, alternating sides with each new knot. Make sure the knots are close together and cover the spine completely.
 
 
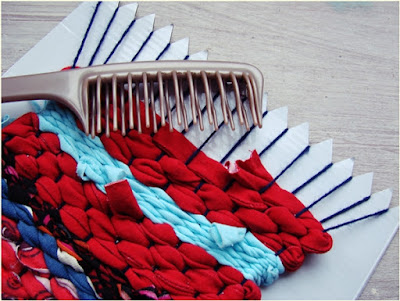
5. Your feather is ready. Now it's time to shape it. Brush or comb the fringes to make them fluffy and soft.
 
6. Then, use scissors to trim the fringes into a symmetrical shape. You can make them round, pointed, or curved, depending on your preference.
 
7. Your macrame leaf is done. You can leave it as it is or add a finishing touch by making a loop at the top of the spine. This will allow you to hang it on a wall, a door, or a window as a decoration.
 
8. You can also use the leftover fringes to make felt balls by rolling them in your hands. These can be used as beads or ornaments for your feather or other projects.

Ready Macrame Feather !
I hope you enjoyed this tutorial on how to make a macrame feather. It is a fun and easy project that you can do with just a few materials and some creativity. You can use your macrame feather as a decoration for your home, a gift for your friends, or a personal accessory. You can also experiment with different colors, shapes, and sizes of your feather. The possibilities are endless!
 
If you liked this post, please share it with your friends and leave a comment below. I would love to see your macrame feather creations and hear your feedback. You can also follow me on Instagram, Pinterest, or Facebook for more DIY ideas and inspiration. Thank you for reading and happy crafting!
Pins: 


Beading Loom /  krosno do biżuterii

8/25/2016

Beading Loom / krosno do biżuterii

Metal-Loom-for-Jewelry-and-Accessories-krosno-do-robienia-bransoletek-jewlery-bead-loom-blog-o-diy-tutorial-Metalowe-krosno-do-tworzenia -dodatków

Jeśli jesteś pasjonatem tworzenia bizuterii, tak jak i ja :-),  to z pewnością zainteresuje Cię mój mały wynalazek. To urządzonko to krosno do tworzenia biżuterii i dodatków. W tworzeniu go inspirowałam się tym pomysłem. 
Prawda , że świetne , nieskromnie mówiąc moje jest jeszcze lepsze i ma więcej funkcji.

If you love making jewelry and accessories, just like me ;-) , you will love my little invention.
It really helps and saves a lot of time. My inspiration for this loom was this interesting device.
It's very helpful but mine is even better and have far more options. 


Co można zrobić na takim krośnie ?
What can you do on such loom ?

starałam się, aby  krosno było jak najbardziej praktyczne i proste w działaniu

I wanted my loom to be perfectly easy in action.
You can make on it : necklaces, bracelets, belts and more.

a możesz na pleść 
naszyjniki ,bransoletki ,paski itd.

w różnych technikach, takich jak:
You can use these techniques:

Makrama / Macrame
Tkanie /Weaving loom
haftowanie / Embroidery
koralikowanie  / Beading 

loom bands


Potrzebujesz:
You need:
metalowa płytka -1 / metal plate x 1
metalowe kątowniki- 4 / metal brackets x 4
klucz francuski / wrench
podkładka z gumą -24 / metal washer with rubber
nakrętki motylki -12 / butterfly shape nut x 12
śruby długie około 10 cm -12 / long screws about 10- 12 cm
śrubki i nakrętki małe -8 / little screws and nuts x 8


Jak stworzyć metalowe krosno?

How to make metal loom?


zaczynamy od połączenia dwóch metalowych kątowników które następnie łączymy z płytką metalową   za pomocą drobnych śrubek i nakrętek 

First connect 2  metal brackets with each other next connect them with metal plate with the help of little screws and nuts.


teraz już wystarczy zamontować po sześć śrub  z podkładkami do góry krosna 

Install 6 long screws , add metal washer with rubber and buterfly shape nuts

Jak skończone metalowe krosno wygląda?

How does ready metal loom look like?


 tak prezentuje się gotowe krosno !

Voila ! metal loom is ready 


Opcjonalnie
Optional

dodatkowo możesz domontować 4  blaszki z śrubkami motylkami do wygodniejszego haftowania :-)

Additionally install 4 oblong metal plates and butterfly shape nuts to make embroidery much easier.


podkładki z gumowym wypełnieniem trzymają solidnie wszystkie rodzaje sznurków , tasiemek i żyłek 

Metal washer with rubbers hold perfect every kind of twines, ropes , ribbons, fishing lines ect.


Jak zamontować w krośnie sznurek ?

How to install twine in metal loom ?


krosno nadaje się też do tkania przeróżnych dodatków, praktycznie z każdego materiału 

You can use metal loom to weaving accessories from almost every fabric 


a z pomocą dodatkowej podłużnej metalowej płytki do haftowania

or to embroidery with little help of  oblong metal plate


Jak zrobić bransoletkę na krośnie?

How to make bracelet with the help of loom ?

Potrzebujesz:
You need:

metalowe śrubki / metal nuts
sznurek np.satynowy lub gorsetowy jak kto woli :-) / twine or anything you like


Zmierz nadgarstek.

Measure your wrist and cut right lenght of twine.


odcinamy pożądaną długość sznurków , tworzymy  zapięcie 

Create clasp to bracelet.


napełniamy śrubkami i przypinamy sznurki do krosna 

Slip metal nuts on twines and pin on twines to loom.


i pleciemy zgodnie z instrukcją na zdjęciach 

Weave according to the instruction on photos.


Jak zabezpieczyć końce przed strzępieniem?

How to protect the ends from unraveling?


syntetyczne materiały podpalamy zapalniczką 
a naturalne lub nie stapiające się materiały podklejamy 

Protect the ends of synthetic twines or ribbons with the help of lighter.
In case of natural fabric use glue.


wyplatamy dalej korzystając z węzła makramowego  lub postępujemy zgodnie z instrukcją na zdjęciach  

Weave more using macrame knot or according to the instruction on photos.


bransoletka gotowa !

Voila! the bracelet is ready :-)


Inne posty o bransoletkach:

Different posts about bracelets:

DIY TUTORIAL HOW TO MAKE LEATHER WATCH STRAP 

JAK ZROBIĆ PASEK DO ZEGARKA Z NITAMI? DIY


Powodzenia!
Good luck!


Kumihimo disc / Jak zrobić bransoletkę kumihimo DIY

6/11/2016

Kumihimo disc / Jak zrobić bransoletkę kumihimo DIY

dysk-Kumihimo-krok-po-kroku- jak-zrobić-i-jak-używać-diy-tutorial-jak-używać-instrukcja-how-to-use-handmade-blog-o-diy-i-design


Zanim kupisz dysk kumihimo warto sprawdzić czy będziesz go używać i czy nie będzie to kolejny zbędny gadżet w twojej szufladzie. Takie cudeńko robi sie w mig  i jest przy tym mase frajdy.
A bransoletki, naszyjniki bądz uszka do torebek wykonane na nim wygladaja ślicznie i pozwalają mocno zindywidualizować garderobę.


Jak zrobić bransoletkę na dysku kumihimo

 Potrzebujesz 
kawałek tektury ale możesz też użyć inne materiały takie jak:
plastikowa gruba pokrywka
styropianowa miseczka 

lub najlepsze i najtrwalsze piankowe podkładki pod kieliszki kosztują tylko 3 zł i będą Ci służyć jako dysk kumihimo bardzo długo :-)

Kumihimo dysk wykonanie 


Szablon 


z pomocą powyższego szablonu lub cyrkla wyrysowujemy nasz dysk kumihimo

                                                   zaznaczamy cztery punkty i nacinamy

Wyplatanie bransoletek na dysku Kumihimo

wybieramy sznurek do plecenia 
im grubszy sznurek tym grubszy warkocz 
wycinamy osiem kawałków sznurka wiążemy na końcu w supeł lub robimy oczko na zapięcie np. guzik
przyczepiamy do naszego dysku kumihimo

               Jak używać i wypleść warkocz na dysku Kumihimo ?


                                         I tak po kilkunastu pleceniach wygląda nasz warkocz :-)
postępujemy zgodnie z instrukcją aż uzyskamy odpowiadającą nam długość naszego sznurka

Bransoletki plecione gotowe 

gotowy sznurek, który możesz przerobić na naszyjniki,bransoletki,rączki do torebek i wiele więcej
                    Do plecenia tych sznurków możesz użyć praktycznie każdy materiał ; sznurek , wstążkę ect.


Inne ciekawe ''sznurkowe'' posty:


DIY TUTORIAL / WOOD KNITTING FORK / 

DZIEWIARSKI WIDELEC / JAK ZROBIĆ SZNUREK KROK PO KROKU


Powodzenia!