Showing posts with label sewing pattern. Show all posts
How to Self Draft Oversized Collar for Any Sewing Pattern

2/19/2024

How to Self Draft Oversized Collar for Any Sewing Pattern


Do you love the look of oversized collars? They are trendy, stylish, and add a touch of flair to any outfit. But what if you don’t have a sewing pattern that includes an oversized collar? Don’t worry, you can easily self draft one yourself!

In this blog post, I will share with you a video tutorial that shows you how to self draft oversized collar for any sewing pattern. You will learn the tips and tricks on how to draft this collar, how to adjust it to fit your neckline, and how to finish it with different options. This is a very easy and fun project that any beginner sewist can do.


What You Need to Self Draft Oversized Collar

To self draft oversized collar, you will need the following materials and tools:


  • A large flat surface for working: You will need a spacious and smooth surface to lay out your pattern paper and draw your pattern pieces. You can use a table, a desk, a floor, or a cutting mat.
  • A large piece of paper, such as tracing paper, to draw your pattern on.
  • Drafting paper
  • A pencil, preferably with a fine point and a good eraser, to sketch and adjust your pattern lines.
  • Notebook
  • A French curve ruler. Grab my french curved rulers for free here.
  • L ruler
  • A measuring tape, to take your body measurements and check the length and width of your pattern pieces.
  • A pair of scissors, to cut out your pattern pieces and your fabric. Check out my detailed post and learn what scissors are the best for your project.
  • Tracing wheel: You will need a tracing wheel to transfer your pattern markings to another paper or to the fabric. A tracing wheel is a tool that has a serrated or smooth wheel at the end of a handle. You can use it to trace the outline or the details of your pattern piece, such as darts, pleats, or notches. There are two types of tracing wheels: pointed and blunted. A pointed wheel is used to transfer pattern shapes to the paper, while a blunted wheel is used with carbon paper to transfer pattern shapes to the fabric.


How to Self Draft Oversized Collar: Video Tutorial

In this video tutorial, I will show you step by step how to self draft oversized collar for any sewing pattern. You will see how to measure your neckline, how to draw the collar shape, how to cut the fabric, and how to sew the collar. You will also see how to create different variations of the collar, such as a peter pan collar, a pointed collar, or a rounded collar. You can customize your collar to suit your style and preference.

Watch the video here


How to Self Draft Oversized Collar: Summary

Here is a quick summary of the steps to self draft oversized collar for any sewing pattern:


Join the front and back pattern pieces at the neck points, making sure the shoulders are aligned


. Make a 1.5-2 cm overlap at the shoulder point on the armhole. 

This will avoid “skirting” which is when the outer edge is a bit too long and creates a bump on the outside edge of the collar.

 Trace the wanted width of the collar, this one is 8-12cm and measure this from the neckline edge, following the curve.


 Mark 1.5cm below the centre front neckline point. This will make the collar curl a little when it’s finished.


 add markings on pattern 


Ready Oversized Collar !

I hope you enjoyed this tutorial on how to self draft oversized collar for any sewing pattern. This is a simple and fun way to add some personality to your sewing projects. You can experiment with different fabrics, shapes, and sizes of the collar to create different looks.

If you liked this tutorial, please share it with your friends and leave a comment below. And don’t forget to subscribe to my YouTube channel for more sewing videos.

Happy sewing!


 #sewing #sewingtutorial #oversizedcollar #selfdraft #sewingpattern #sewingtips #sewingblog #sewingvideo

 How to Self Draft Sewing Patterns for Raglan Clothes | Easy Tutorial for Beginners

1/12/2024

How to Self Draft Sewing Patterns for Raglan Clothes | Easy Tutorial for Beginners


Do you love raglan clothes, but can't find them in stores or online? Or do you want to express your creativity and make your own unique and flattering raglan garments? If you answered yes to any of these questions, then this blog post is for you.

In this post, I will share with you a video tutorial on how to self draft sewing patterns for raglan clothes, and how to customize them for different styles and designs. Raglan clothes are garments that have sleeves that extend from the collar to the underarm, giving them a distinctive look and fit. They are perfect for casual wear, sports, and layering.

You will learn how to create a basic raglan bodice pattern, and how to modify it for a raglan top, blouse, and dress. You will also learn how to create puff raglan sleeves, balloon sleeves, raglan long and short dresses, and much more.

This tutorial is super easy and suitable for beginners who want to learn how to self draft sewing patterns for raglan clothes. I will show you step by step how to measure, cut, sew, and finish your raglan garments. You will be amazed by how many different raglan clothes you can make with just one pattern.

So, if you are ready to unleash your creativity and make your own raglan clothes, watch this video and follow along. And don't forget to subscribe to my YouTube channel for more sewing videos.


What Measurements do you Need to Self Draft Raglan Dress or Top ?

To make a raglan top or dress pattern, you need to measure the following:

Bust

mannequin and measuring tape around bust part

Waist

mannequin and measuring tape around  waist part

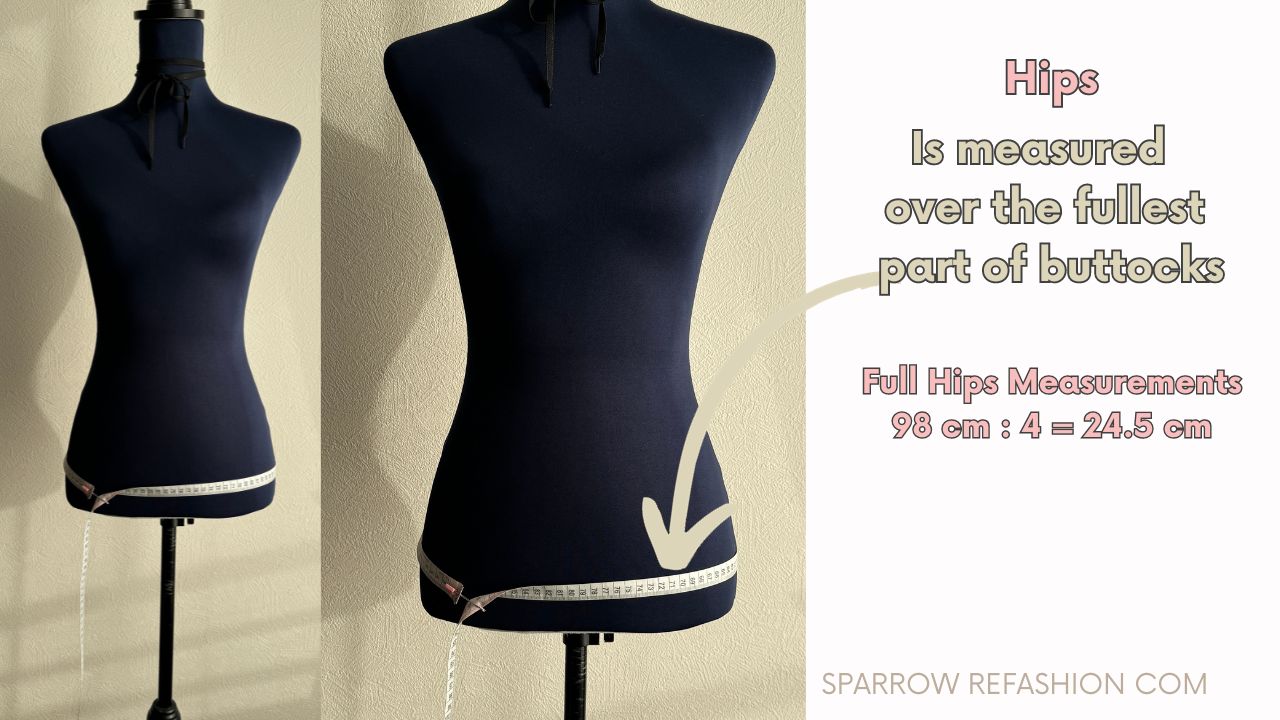
Hips

mannequin and measuring tape around hips part

Desired garment length

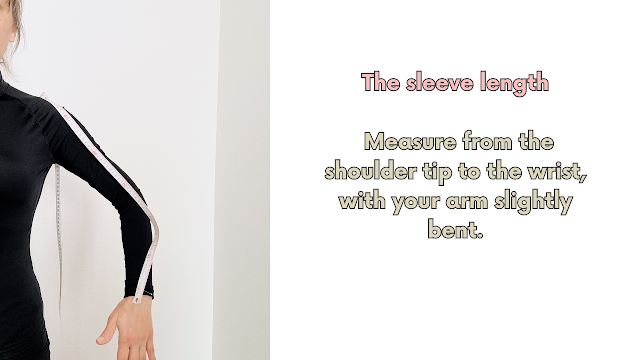
Arm length

sleeve with measuring tape

Upper arm circumference

Wrist circumference

wrist with measuring tape

Check out my detailed post on how to measure yourself for self pattern drafting

 Step by Step Video Tutorial

[Watch the video here]


Detailed Videos on How to Sew Raglan Clothes

How to sew baby doll raglan dress


How to sew boho raglan dress


How to sew Crop and long Raglan Top and Blouse 

Thank you for reading and happy sewing!

Pins:


How to Design Simple Dresses Without Darts for Beginners | Pattern Drafting Tutorial

12/13/2023

How to Design Simple Dresses Without Darts for Beginners | Pattern Drafting Tutorial


Hello, everyone! In this post, I’m going to share with you a very special video that I made for you. It’s a pattern drafting tutorial on how to design simple dresses without darts for beginners.


Darts are folds or seams that shape the fabric to fit the body. They are usually used to create curves and contours on garments, especially around the bust, waist, and hips. However, darts are not always necessary or desirable. Sometimes, you may want to create a simple, loose-fitting, or flowy dress that doesn’t require darts. Or, you may want to avoid darts because they are too complicated or time-consuming to make.

That’s why I decided to make this video for you. In this video, I will show you how to design (self-draft) simple dresses without darts, using just some basic measurements, paper, pencil, ruler, and scissors. You will learn how to make the pattern and how to alter it to create different styles and shapes. You will also learn how to make a jumbo collar, a princess seam, a two-piece set, and more!

This video is perfect for anyone who wants to learn how to design and sew their own clothes, or just have some fun with fashion. You don’t need any fancy tools or software, just some creativity and enthusiasm. By the end of this video, you will be able to design your own simple dresses without darts and impress your friends and family with your handmade creations.

 What you need:

  • A large piece of paper, such as tracing paper, to draw your pattern on.
  • A pencil, preferably with a fine point and a good eraser, to sketch and adjust your pattern lines.
  • Notebook
  • A French curve ruler, to draw smooth curves for the neckline and armholes of your dress. Grab my french curved rulers for free here.
  • L ruler
  • A measuring tape, to take your body measurements and check the length and width of your pattern pieces.
  • A pair of scissors, to cut out your pattern pieces and your fabric.

So, what are you waiting for? Click the link below to watch the video and don’t forget to like, comment, share, and subscribe to my channel for more pattern drafting tutorials.

Watch the video here

To give you a sneak peek of what you will learn in this video, here are some photos of the jumbo collar, the pattern making process, the two-piece set, and the princess seams. I hope you like them and get inspired to try them out yourself.


I hope you enjoyed this post and found it useful. If you have any questions, suggestions, or feedback, please leave them in the comments section below. I would love to hear from you and see your creations. You can also tag me on Instagram or Facebook with your photos.

Thank you so much for reading and watching. Stay tuned for the next post, where I will show you how to design a skirt with pockets. You don’t want to miss that one. Until then, happy sewing and bye for now! 😊


pins:


This post has affiliate links * Affiliate Link. This means that if you click on the link and purchase an item, I will receive a small percentage of your purchase (at no extra cost to you).
 

How to Sew Flounce Sleeves: A Free Pattern and Easy Tutorial

12/10/2023

How to Sew Flounce Sleeves: A Free Pattern and Easy Tutorial


Flounce sleeves are a fashionable and fun way to add some flair to your outfits. They come in different styles and shapes, and they can make any outfit look more feminine and elegant. In this blog post, I’m going to share with you a video tutorial on how to sew 7 types of flounce sleeves, and a free printable pattern for the basic flounce sleeve.


What are flounce sleeves?

Flounce sleeves are sleeves that have a ruffle or a flare at the end. They are usually made from a circular or a semi-circular piece of fabric that is attached to the sleeve hem. Flounce sleeves can vary in length, width, and shape, depending on the style and the design of the garment.

Flounce sleeves are different from ruffle sleeves, which are made from a rectangular piece of fabric that is gathered along one edge and sewn to the sleeve hem. Ruffle sleeves have more volume and texture than flounce sleeves, which are smoother and more flowy.

Flounce sleeves are also different from bell sleeves, which are sleeves that are fitted at the upper arm and gradually widen towards the wrist. Bell sleeves are usually made from the same piece of fabric as the sleeve, without any seams or attachments.


Why sew flounce sleeves?

Flounce sleeves are a great way to spice up your wardrobe and express your personality. They are also very easy to sew and can transform any outfit from boring to fabulous. You can sew flounce sleeves on any type of garment, such as dresses, tops, blouses, jackets, or coats. You can also mix and match different fabrics, colors, and patterns to create unique and stunning flounce sleeves.

Flounce sleeves are also very versatile, and you can create different looks with them. You can go for a romantic and vintage look with lace or floral flounce sleeves, or a modern and chic look with leather or metallic flounce sleeves. You can also go for a casual and playful look with denim or striped flounce sleeves, or a sophisticated and elegant look with silk or satin flounce sleeves.


How to sew flounce sleeves?

If you want to learn how to sew flounce sleeves, you’re in luck. I have created a video tutorial on how to sew 7 types of flounce sleeves, and I’m going to share it with you in this blog post. In this video, you will learn how to sew:

  • High low circle sleeve
  • Bell sleeve
  • Semi circle sleeve
  • Gathered ruffle sleeve
  • Circle ruffle sleeve
  • Double gathered ruffle sleeve
  • Double circle ruffle sleeve


These flounce sleeves are super easy to make and are suitable for beginners. I will also provide you with a free printable pattern for the basic flounce sleeve, which you can download from the link below. I will show you step by step how to sew each of these sleeves, and you don’t need any fancy equipment or skills, just a sewing machine, some fabric, and some scissors.


So, what are you waiting for? Watch the video and let me know what you think in the comments. And don’t forget to like, share, and subscribe to my YouTube channel for more sewing tips and tricks. I hope you enjoy the video and have fun sewing!

Watch the video here

Check out how to hem the sleeves here


Pins: