Showing posts with label tutorial. Show all posts
Łatwe Szycie : Spódnica Bombka Mini plus Darmowy Wykrój

12/29/2024

Łatwe Szycie : Spódnica Bombka Mini plus Darmowy Wykrój


Jeśli chcesz nauczyć się, jak uszyć spódnicę bombkę mini, jesteś we właściwym miejscu! W tym poście znajdziesz krok po kroku tutorial, który jest łatwy nawet dla początkujących. Projekt zawiera darmowy wykrój dostępny w 8 rozmiarach oraz wideo poradnik, który pomoże Ci dopasować tę spódnicę do każdej figury.

Co to jest spódnica bombka mini?


Spódnica bombka to stylowa i efektowna część garderoby, idealna na różne okazje. Jej charakterystyczny wygląd wynika z użycia lekkiego materiału, który tworzy marszczenia i bąbelkowy efekt. Dzięki temu tutorialowi dowiesz się, jak stworzyć ten wyjątkowy model spódnicy.

Przygotowanie materiałów


Do uszycia spódnicy bombki potrzebujesz lekkiego materiału na zewnętrzną warstwę oraz podszewki. Świetnym wyborem będą materiały takie jak bawełna, szyfon, czy lekki denim, które dobrze układają się i nie sprawiają, że spódnica wygląda na zbyt masywną. Unikaj ciężkich tkanin, takich jak wełna​

Darmowy wykrój spódnicy bombki w 8 rozmiarach
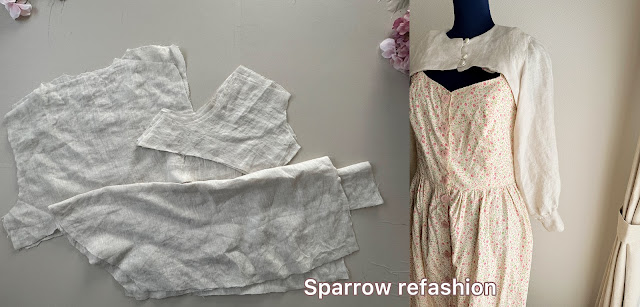
Jeśli ci się podoba ta bluzeczka zobacz tutaj ten tutorial jak ją uszyć.
 

Jeśli marzysz o idealnej spódnicy bombce, to dobrze trafiłaś! Aby ułatwić Ci proces szycia, przygotowałam darmowy wykrój, dostępny aż w 8 różnych rozmiarach. Możesz pobrać go bezpłatnie i od razu rozpocząć swoją przygodę z szyciem tej modnej spódnicy.

Tworzenie własnego wykroju – wideo poradnik


Dla wszystkich, którzy chcą nauczyć się tworzenia wykrojów, w szczególności tych do podstawowej spódnicy oraz spódnicy bombki, przygotowałam wideo tutorial. Pokaże Ci, jak w łatwy i szybki sposób stworzyć idealny wykrój dopasowany do Twojej sylwetki. Tworzenie wykrojów jest naprawdę proste i zajmuje tylko chwilę – wystarczy kilka kroków, aby cieszyć się spódnicą szytą na miarę!


Szycie Spódnicy Bombka Mini Krok po kroku:

Przygotowanie zewnętrznej tkaniny spódnicy


Szycie kieszeni
Zmierz 7 cm od talii i oznacz miejsce, gdzie będą kieszenie. Następnie przypnij kieszenie prawą stroną do prawej na bokach spódnicy i przyszyj. Dzięki temu zyskasz praktyczne i estetyczne kieszenie.

Marszczenie dolnej krawędzi spódnicy
Przyszyj dół spódnicy, używając luźnych szwów, aby uzyskać efekt marszczenia. Jeśli chcesz zobaczyć dokładny sposób na szycie marszczonych szwów, zajrzyj do szczegółowego tutorialu (link).


Szycie podszewki i spódnicy


Łączenie podszewki ze spódnicą
Zmniejsz szerokość zewnętrznej tkaniny spódnicy do szerokości podszewki, tworząc marszczenie. Następnie przypnij prawymi stronami do siebie podszewkę i spódnicę, a potem zszyj.


Szycie drugiej części spódnicy
W ten sam sposób zszyj drugą część spódnicy. Prawą stroną do prawej przypnij obie części tkaniny zewnętrznej oraz podszewki i zszyj boki.


Obrócenie spódnicy na prawą stronę
Obróć spódnicę na prawą stronę, a górny brzeg wykończ podszewką.


Wykończenie talii


Szycie talii
Złóż górną krawędź spódnicy i podszewki o 1 cm do środka, tworząc ładne wykończenie.


Elastyczna talia
Wytnij pasek gumy o długości obwodu talii plus 4 cm i szerokości 4 cm. Następnie przyszyj górny brzeg paska, zostawiając otwór 4 cm. Pod linią talii przyszyj tunel na gumkę o szerokości 5 cm.


Przełożenie gumy
Przełóż gumkę przez pozostawiony otwór, zszyj jej końce, a następnie zaszyj otwór.


Prasowanie i gotowe!
Wygładź całość żelazkiem, aby uzyskać idealnie wykończoną spódnicę.

Twoja spódnica bombka jest teraz gotowa do noszenia!


Spódnica Bombka Mini - Wygoda

Teraz, gdy już wiesz, jak uszyć spódnicę bombkę mini, czas na działanie! Skorzystaj z darmowego wykroju i szczegółowego poradnika, aby stworzyć modną spódnicę, która przyciągnie spojrzenia. Pamiętaj, że możesz eksperymentować z różnymi materiałami i długościami, aby stworzyć coś unikalnego. Twój własny projekt to nie tylko wyjątkowa część garderoby, ale też satysfakcja z wykonania czegoś samodzielnie!

Szukaj więcej inspiracji i materiałów na naszej stronie – powodzenia w szyciu!

How to Make a Macrame Feather - A Trendy DIY Decoration

2/13/2024

How to Make a Macrame Feather - A Trendy DIY Decoration


Macrame feathers have become a decorative hit. They are easy to make and can add a touch of boho chic to your home. You can also use them as accessories for your keys, necklace, earrings, or even a bookmark. In this post, I will show you how to make a macrame feather with just a few materials.

Inspiration:


 What you need:

 
- Yarn or string
- Scissors
- Brush or comb, mine I borrow from my dog 😁

How to make a macrame feather

1. Cut one piece of yarn or string to the length of your desired leaf or feather. This will be the spine of your feather. 
2. Cut about 40-50 shorter pieces of yarn or string. These will be the fringes of your feather. You can use one color, two colors, or multiple colors for a more colorful effect.
 
3. Fold the fringes in half and attach them to the spine using lark's head knots. To do this, place the folded end of a fringe over the spine, then pull the two loose ends through the loop and tighten. See the picture below for reference.
 
4. Repeat this step with each fringe, alternating sides with each new knot. Make sure the knots are close together and cover the spine completely.
 
 
5. Your feather is ready. Now it's time to shape it. Brush or comb the fringes to make them fluffy and soft.
 
6. Then, use scissors to trim the fringes into a symmetrical shape. You can make them round, pointed, or curved, depending on your preference.
 
7. Your macrame leaf is done. You can leave it as it is or add a finishing touch by making a loop at the top of the spine. This will allow you to hang it on a wall, a door, or a window as a decoration.
 
8. You can also use the leftover fringes to make felt balls by rolling them in your hands. These can be used as beads or ornaments for your feather or other projects.

Ready Macrame Feather !
I hope you enjoyed this tutorial on how to make a macrame feather. It is a fun and easy project that you can do with just a few materials and some creativity. You can use your macrame feather as a decoration for your home, a gift for your friends, or a personal accessory. You can also experiment with different colors, shapes, and sizes of your feather. The possibilities are endless!
 
If you liked this post, please share it with your friends and leave a comment below. I would love to see your macrame feather creations and hear your feedback. You can also follow me on Instagram, Pinterest, or Facebook for more DIY ideas and inspiration. Thank you for reading and happy crafting!
Pins: 


How to Sew a Linen Bolero Shrug with Long Puff Sleeves and Cuffs | Free PDF Patterns

1/07/2024

How to Sew a Linen Bolero Shrug with Long Puff Sleeves and Cuffs | Free PDF Patterns


Do you love sewing and want to create a unique and fashionable piece of clothing? Do you want to learn how to sew long puff sleeves and cuffs, and how to hack a basic bodice pattern to make a bolero shape? If yes, then this video tutorial is for you!

 diy puff sleeve linen bolero shrug on woman

In this video, I will show you how to sew a stunning bolero shrug from linen fabric. This is a perfect project for beginners who want to level up their sewing skills and create a unique piece of clothing that you can wear with any outfit.

I will guide you through the whole process, from cutting the fabric to finishing the edges. And the best part is, I have included free PDF patterns of the sleeves and the bodice that you can download and print at home. Just follow the link below.

So grab your sewing machine and let’s get started!

What you will need:

To make this bolero shrug, you will need the following materials and tools:

  • Linen fabric (about 1.5 meters)
  • Matching thread
  • Scissors
  • Pins
  • Measuring tape
  • Sewing machine
  • Iron
  • Bias tape
  • Free PDF patterns (download link in the description)

How to cut the fabric:

The first step is to cut the fabric according to the patterns. You will need to cut two pieces for the bodice (front and back), two pieces for the sleeves, and four pieces for the cuffs.

To cut the bodice, fold the fabric in half and place the pattern on top. Make sure the grainline is parallel to the selvage. Pin the pattern to the fabric and cut around it. Repeat the same for the back piece.

To cut the sleeves, fold the fabric in half and place the pattern on top. Make sure the grainline is parallel to the selvage. Pin the pattern to the fabric and cut around it. Repeat the same for the other sleeve.

To cut the cuffs, fold the fabric in half and place the pattern on top. Make sure the grainline is parallel to the selvage. Pin the pattern to the fabric and cut around it. Repeat the same for the other three cuffs.

 cutted out part of linen boler shrug and ready puff sleeve bolero on mannequin

How to sew the sleeves and cuffs:

The next step is to sew the sleeves and cuffs. To do this, follow these steps:

  • Fold each cuff piece in half, right sides together, and sew along the short edge. Press the seam open and turn the cuff right side out.
  • Pin the cuff to the bottom edge of the sleeve, right sides together, matching the seams. Sew along the edge with a 1 cm seam allowance. Press the seam towards the sleeve and topstitch along the edge of the cuff.
  • Fold the sleeve in half, right sides together, and sew along the long edge. Press the seam open and turn the sleeve right side out.
  • Repeat the same for the other sleeve and cuff.

 ready puff sleeves and ready bolero shrug on mannequin

How to hack the bodice pattern:

The next step is to hack the bodice pattern to make a bolero shape. To do this, follow these steps:

  • Take the front bodice pattern and draw a curved line from the shoulder to the center front, about 10 cm below the neckline. Cut along the line and discard the lower part. This will be the new front bodice pattern.
  • Take the back bodice pattern and draw a curved line from the shoulder to the center back, about 10 cm below the neckline. Cut along the line and discard the lower part. This will be the new back bodice pattern.

 printed sewing pattern and puff sleeve bolero shrug on mannequin

How to sew the bodice:

The next step is to sew the bodice. To do this, follow these steps:

  • Pin the front and back bodice pieces, right sides together, at the shoulders and side seams. Sew along the edges with a 1 cm seam allowance. Press the seams open and turn the bodice right side out.
  • Pin the sleeves to the armholes, right sides together, matching the notches and seams. Sew along the edges with a 1 cm seam allowance. Press the seams towards the bodice and topstitch along the edge of the armhole.
  • Pin the bias tape to the neckline, right sides together, stretching it slightly to fit the curve. Sew along the edge with a 1 cm seam allowance. Trim the excess fabric and press the seam towards the bodice. Fold the bias tape to the wrong side of the bodice and pin it in place. Topstitch along the edge of the bias tape.
  • Pin the bias tape to the front edges of the bodice, right sides together, stretching it slightly to fit the curve. Sew along the edge with a 1 cm seam allowance. Trim the excess fabric and press the seam towards the bodice. Fold the bias tape to the wrong side of the bodice and pin it in place. Topstitch along the edge of the bias tape.

 ready bolero shrug on mannequin

Free PDF Patterns 

Click this link and download free PDF pattern for basic bodice and sleeve for this bolero shrug.

Step by Step Video Tutorial

If you prefer to watch a video tutorial on how to sew this bolero shrug, you can find it on my YouTube channel. I will show you how to cut the fabric, hack the pattern, how to sew bolero, and how to make some adjustments if needed.

Super easy video tutorial on how to sew this beautiful bolero shrug.

How to Style a Puff Sleeve Bolero Shrug ?

shoes, bags and jewely to style diy puff sleeve bolero

Here are some tips to style it fashionably:

  • Dressy Casual: Layer your bolero over a long, lean tank top paired with fabulous jeans. Add heels and a sparkly necklace or earrings for a chic look that transitions from day to night.
heels
necklace
earrings
  • Maxi Dress Elegance: Wear your bolero over a floral maxi dress with delicate earrings and pumps. Choose a solid color bolero to complement the pattern. This combination balances the length of the dress, draws the eye upward, and can add height to your silhouette.
earrings
pumps
  • Formal Flair: Pair your bolero with a cocktail dress with pumps and clutch for formal occasions. The bolero will cover your shoulders and arms without detracting from the details of your dress, providing a sophisticated layer of warmth.
pumps
bag
  • Everyday Style: For a more casual approach, wear your bolero with a simple tee or blouse ,backpack and sneakers. This can be a great way to dress up an everyday outfit while staying comfortable.
backpack
sneakers
  • Proportions Matter: Consider your body proportions when styling your bolero. If you have a defined waist, choose a bolero that crops at the smallest part of your waist to create a curvy silhouette.

Remember, the key to styling is to maintain balance and harmony in your outfit. The bolero should complement, not overpower, your look

Congratulations, you have just made a beautiful and trendy bolero shrug from linen fabric! You can now wear it with any outfit and enjoy the compliments. I hope you enjoyed this video tutorial and learned something new. If you did, please give this video a thumbs up and subscribe to my channel for more sewing tutorials. Don’t forget to download the free PDF patterns from the link in the description box below.

I would love to see your creations, so please share them with me on Instagram or Facebook using the hashtag #sparrowrefashion. You can also leave me a comment below and let me know what you think of this project or what you would like to see next.

That’s all for today, see you next time. Happy sewing!


Pins: 


 This post has affiliate links * Affiliate Link. This means that if you click on the link and purchase an item, I will receive a small percentage of your purchase (at no extra cost to you).